Depot Controls Help
Depot Controls
Depots are used to purchase and manage vehicles and convoys. Different types of transport have their own depot. Electric vehicles may only be purchased from a depot that is on an electrified way, which is indicated by a red lightning flash in the top right hand corner. If playing with the
timeline turned on, then, as time passes, in Simutrans more vehicles may become available.
Click on a depot in the main game window with the
inspection tool to open the
depot controls window. The
depot controls window provides information about and allows the purchase, sale, upgrading and management of
convoys. The title bar of the
depot controls window indicates which type of vehicle transport that the depot serves.
Depot Controls can be
re-sized (click on down-arrow on titlebar of controls to return to original size).
Click on left/right-arrows on titlebar to cycle through depots of the same transport type (centres the main game window on depot).
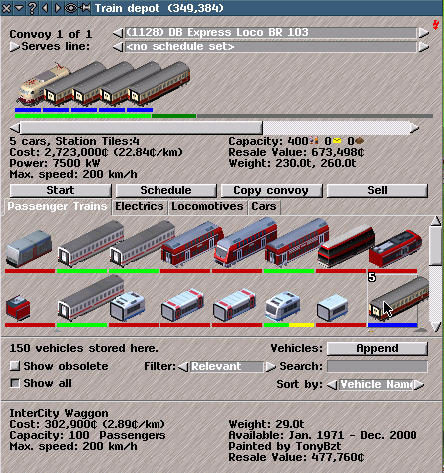
At the top of
Depot Controls the number of
Convoys in depot, Convoy name and
Line is shown.
Convoy Name: Click on left/right-arrow buttons by Convoy Name to cycle through Convoys in depot.
To change Convoy Name: click on convoy-name box and type new name (by default this is make of first the vehicle purchased or assembled for a new Convoy).
Line Name: Click on left/right-arrow buttons by name to select Lines for transport type of depot or click on line-name box to open a drop-down-list of Lines (click on Line in drop-down-list to select).
To change Line Name: click on line-name box and type new name. (by default this is assigned number when Line is created).
Current convoy (graphic) Below the convoy and line name boxes, a picture of the selected (if any) convoy is shown. Move the mouse over a the picture of the vehicle in the selected convoy to see details about that vehicle (shown at bottom of the depot controls window). Click on a the vehicle in the picture of the convoy to remove it from the selected convoy and store it in the depot.
Below the graphic, the number of vehicles in the selected convoy, the length of the Convoy, and any assigned lLine are shown. The length is important because, if a convoy is too long for a stop, the vehicles at the back will be left out of the stop and will not be able to load/unload there.
Option buttons (click to use) include:
Start: sends the selected
convoy out of the depot if a route can be found.
Schedule: opens controls to change the route and quantity of items that a
convoy will wait for at a
Stop.
Disassemble: puts the vehicle unit(s) in selected
convoy into storage in the depot.
Sell: sells the current
convoy, realising the
resale value.
Apply Line: assigns the
Line displayed in line name box at the top of the
Depot Controls window to the selected
Convoy.
Copy convoy: purchases and assembles another convoy with an identical compostion,
schedule and
line to the selected convoy.
The vehicles: are split into categories, which can be viewed by clicking on the appropriate tabs. The tabs divide the vehicles into the following groups: vehicles for passengers and mail, other powered (motorised) vehicles, and unpowered trailers/carriages. If the depot is electrified (shown by a red lightning flash in the top-right hand corner), there will also be a separate tab for powered electric units (called "trolleybuses" if the depot is a road depot). A white number over the picture of the vehicle indicates the quantity of that type of vehicle stored at the depot. Stored vehicles can be sold or are used when a new convoy is assembled.
Move the mouse over a the pictures of the vehiclea to see information about those vehicles:
Name: and in brackets type of power used for motorised vehicles;
Cost: the purchase price and in brackets operation cost per kilometre and per month;
Power: tje engine power and maximum speed for motorised vehicles;
Capacity: the quantity and
category of items that can be carried by the vehicle. If the vehicle has an overcrowded (standing) capacity, this will be shown in brackets;
Loading time: how long that it takes the vehicle to load and unload at stops;
Comfort: how
comfortable that the vehicle is for passengers to use (0 - 255);
Weight: in metric tonnes;
Top speed: the fastest speed at which the vehicle can travel;
Intro. date: the date on which the vehicle becomes available if the
timeline is turned on;
Retire date: the date on which the vehicle becomes obsolete if the
timeline is turned on;
Constructed by: the name of the person who created the vehicle for Simutrans;
Gear: the factor by which the power is multiplied in the game;
Resale Value: the amount of money that can be realised by selling the vehicle now;
Tilting vehicles: whether the vehicle can tilt in order to take corners at higher speed; and
Catering level: if this vehicle provides
catering facilities for passengers, the level at which it does so.
Click on a vehicle graphic to purchase, upgrade to or sell it depending on settings described below at the bottom left of the depot controls window. There are two drop-down menus underneath the word Vehicles:. To cycle through either of them, either press the left or right arrows, or click the text to see all the options at once.
The first vehicle operations menu has three options:
Append: purchases a vehicle and adds it to the selected convoy, or, if no convoy is selected, creates a new convoy, and adds it to that.
Put in front: purchases a vehicle and adds it to front of selected convoy, or, if no convoy is selected, creates a new convoy, and adds it to that.
Sell Now: sells a stored vehicle of the type selected.
The second vehicle operations menu has two options:
Buy/sell: This is the default mode. Vehicles are either purchased or sold outright.
Upgrade: In this mode, existing vehicles are upgraded to other vehicles. When this is selected, the cost shown will be the cost of upgrading any existing vehicles to the selected vehicle, not the cost of buying it new. Unless show all is selected, only vehicles to which the current vehicle can be upgraded will be shown.
Color bars: under the each vehicle graphic, there are coloured bars, which indicate whether the vehicles can be purchased, upgraded, or used in particular combinations in a
convoy. Colour bars may change with different settings in the vehicles operations menus.
Colours indicate:
-
Green: the vehicle can be purchased (or upgraded), and can be used in the present position in the selected convoy.
-
Red: the vehicle cannot be added to the convoy in the present position.
-
Yellow another vehicle must be placed in front or behind to make an operational convoy.
-
Orange there is not enough money to purchase the vehicle.
-
Blue: the vehicle can be used but is obsolete.
-
Lilac: the vehicle cannot be bought new, only upgraded from an existing vehicle.
-
Purple: the current vehicle cannot be upgraded to this vehicle.
A convoy that can be used shows green bars for all the vehicles in it. If any yellow bars are visible, then another vehicle is required next to the one with the yellow bar to make the convoy useable.
Show all: by default, only vehicles that can be used and purchased/upgraded are shown. Selecting this option displays all vehicles, whether they can be used or not.
Show obsolete: if playing with a
timeline, selecting this option displays obsolete vehicles in addition to current vehicles.